Kara Clang
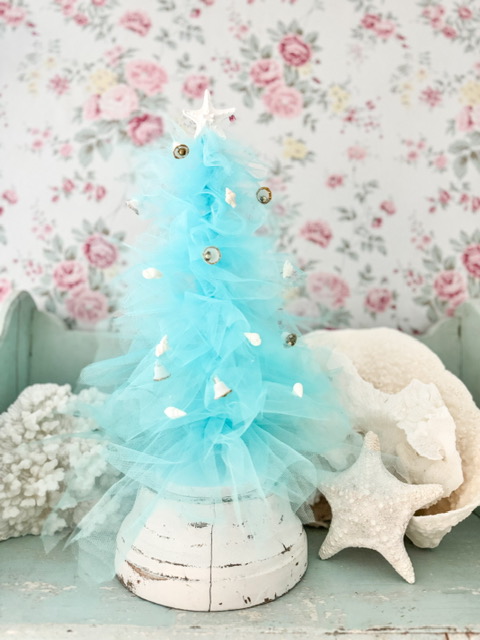
Do you remember visiting your grandma’s house in the 1970s and spotting that magical tulle Christmas tree in the corner? I sure do. I was completely enchanted — it looked just like one of those dreamy skirts the older girls wore, the kind I always wished I could twirl around in. That memory stuck with me. So last year, I decided to bring a little of that magic back. I know there are tutorials out there, but most involve sewing — and let’s just say, that’s not my superpower. So I came up with a simple, no-sew way to make one myself.
What You’ll Need to Make the Magic Happen:
- A sturdy base – Styrofoam for a quick fix or a wooden block for a more polished look
- A wooden dowel – This will be the “trunk” of your tree
- Tulle, tulle, and more tulle! –Choose your favorite colors and textures to bring your tree to life. I used about 2 yards
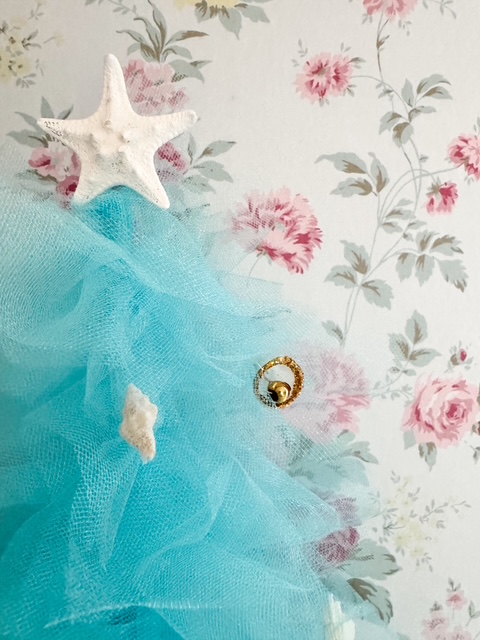
- Hot glue gun – Your trusty sidekick for keeping everything in place Decorative touches (optional but fun!) – Think vintage mini ornaments, dainty millinery flowers, sparkly garlands, or even a sprinkle of glitter — let your creativity run wild! I crafted a unique tree topper using a blend of natural and nostalgic elements—delicate seashells, vintage sugar bells, and a starfish as the crowning star.
Start by dreaming up the perfect height for your tree — tall and elegant or short and sweet, it’s totally up to you. Once you’ve decided, cut your dowel to match your vision. I usually go with about 15 inches, but feel free to make it your own.
Next, let’s give your tree a sturdy foundation. If you’re using a Styrofoam base, simply press the dowel into the center and secure it with a generous dab of hot glue. Later, you can nestle the whole thing into a festive pot or container of your choice. Prefer a wooden base? Just drill a small hole, pop in the dowel, and again, a little hot glue will keep everything standing tall and proud.
Now it’s time to bring your tree to life with layers of dreamy tulle! Start by deciding on the lengths you’ll need — think of it like dressing your tree in a fabulous gown with cascading tiers. You’ll want a variety of sizes to create that full, flowing effect. Grab your scissors and start cutting strips of tulle in different lengths — the more variety, the more whimsical your tree will look. I use the following measurements:
- 10 double strips of 13 inches
- 10 double strips of 11 inches
- 10 double strips of 9 inches
- 8 double strips of 7 inches
- 8 double strips of 5 inches
With your tulle all cut and ready, it’s time for the most magical part — dressing your tree! Think of it like giving your tree its very own tutu. Take a strip of tulle, wrap it around the dowel, and tie it in a simple knot. Keep going, spacing your knots around the dowel to create a full, fluffy look with a bit of playful variation. Once every piece is tied on, take a moment to fluff and fluff some more — this is where your tree really comes to life, like a ballerina twirling in a winter wonderland.
Now comes the sparkle! You can leave your tree beautifully simple and let the tulle take center stage, or sprinkle in some magic — fairy lights, tiny ornaments, glittery stars, or whatever makes your heart happy. Top it off with a little extra charm! Add a fluffy tulle bow for a soft, whimsical touch, or crown your tree with a sparkling star to give it that classic holiday magic. Whether you go bold or keep it sweet and simple, the finishing touch is all yours to imagine! There’s no right or wrong here — just follow your imagination and let your tree reflect your unique holiday spirit.
And there you have it — your very own whimsical tulle Christmas tree! I hope this little project brings a sprinkle of nostalgia and a whole lot of joy to your day. May your holidays be as magical as this childhood memory.